
Pneumatic Tyre Fitting
- Always work in a clean environment where possible.

- Before fitting check that the tyre is the correct size for the rim and there are no obvious signs of damage or manufacturing defect.
- If using a new inner tube (advisable) check that it is the correct size for the tyre you are fitting it to. If you are re using an existing inner tube carefully check that there is no visible damage from foreign bodies or fitting damage from previous use.
- Check the rim carefully for signs of damage in particular those parts that will be in contact with the tube.
- Carefully check that the tyre and inner tube are free of debris. If the wheel has spokes fitted check that the correct rim band is fitted and positioned to cover the heads of the spokes.
- For a one piece rim fit one side of the tyre to the rim first then fit the inner tube into the tyre and partially inflate – this will avoid pinching the tube when fitting the other bead. Position the tyre and tube on the rim so that the bottom bead is located and the top bead sits on the rim. Using the correct fitting levers carefully ease the second bead onto the rim taking care not to pinch the inner tube between the tyre and rim. Extra care should be taken with the last portion of the tyre when prising onto the rim to avoid breaking the bead wire.
- For a two piece rim place the tube inside the tyre and partially inflate before putting the two rim pieces together. When bolting the two halves together check carefully that the inner tube does not become trapped between the two halves.
- When the tyre has been successfully fitted carefully check that it is fitted concentrically on the rim (there is generally a ring around the bead area to enable correct positioning).
- During inflation check that the tyre remains in position and does not hang up on part of the rim. The valve area can sometimes be a problem on narrow tyres as the base of the valve can become trapped between the tyre bead and the rim; if this occurs carefully push the valve partially through the valve hole into the tyre and continue inflating.
- Always inflate the tyre to the correct pressure (check the wheelchair/scooter handbook for the recommended tyre pressure) do not take the maximum pressure data on the sidewall of the tyre as the correct pressure this is merely a guide as to the maximum pressure it can be inflated to.
- Check that the valve is not leaking.
- Fit a proper valve cap that includes an internal seal as this is the primary air seal. Plastic dust caps should be avoided as they have no pressure sealing properties but are better than nothing.
- Replace the wheel taking care to ensure that the wheels nuts are tight or the quick release axle is properly located.
- Finally tyre pressures should be checked regularly to ensure correct and trouble free operation of the tyre.
Solid Wheelchair Tyre Fitting
Fitting solid wheelchair tyres can be a time-consuming process, but can be done with the right tools. Tyres must be carefully stretched onto a rim so that the tyre will fit correctly. Solid wheelchair tyres fit much easier when they are warm, so placing them by a radiator, or in warm water before you fit them will help.
- Start by removing the existing tyre.
- Push the new tyre onto the rim and secure with a cable tie
- Feed the rest of the tyre around the rim and hold with your hand
- You will now have the tyre approx two thirds around the rim and the rest diagonally from your hand to the cable tie.
- With a tyre lever, lever small sections of the tyre onto the rim. As you do this, move your hand to hold the section you have levered on. Only lever small sections at a time (approx 2”-3”) if you try and lever too much, you can snap the cords in the tyre and render it useless.
- When the final section has been levered into place, work around the tyre with your hands to make sure it is seated into the rim correctly all the way around. Remove the cable tie and refit the wheel to the chair.
NOTE: Do not use more than one cable tie. The solid tyre is designed to stretch over its entire length. Additional cable ties restrict the area of stretch and lead to snapping of the cords within the tyre.
For fitting tips please follow the following link; Greentyre fitting tips
Solid Scooter & Powerchair Tyre Fitting
All of our solid puncture proof scooter and powerchair tyres are designed to be fitted onto 2 piece rims.
- First remove the wheel from the machine. This is generally held by a central nut. You may want to prop the machine up to prevent it resting on the axles.
- Once removed, If the wheel is fitted with a pneumatic tyre, this must be deflated next.
- The wheel will then need to be “split” which should be done by undoing the bolts on the inner part of the rim. It’s best to loosen each bolt a little at a time, rather than one by one.
- The rim may need to be prized apart with levers, as over time they can stick together. The tyre should then remove easily once the wheel is separated.
- Then sandwich the 2 pieces of the rim onto the solid tyre, ensuring the bolt holes are lined up. The rims will be tight to press together, and longer bolts or clamps may be required to ensure the original bolts can meet.
- It’s best to partially tighten each bolt to ensure the rims close together evenly.
We do offer a collection, fitting and redelivery service for a small fee. You will obviously be without the scooter or powerchair during this process which takes up to 5 working days as you will need to send us your rims/wheels. Contact us for further details.
How do I know which tyre I need?
Your scooter/power chair handbook may show the tyre size. However this may be shown as an overall dimension of the tyre such as 12″. Therefore always check what is written on the tyre itself.
All tyres have a size marking on the sidewall of the tyre but the way it is shown does vary between manufacturers and may show two or three markings. Some of these are shown in the table below. When you have a note of all the sizes listed on the tyre, you should be able to find the correct tyre in the relevant categories.
| Tyre Size | Alternative Size |
| 200 x 50 | 8 x 2 |
| 300 x 4 | 260 x 85 or 10 x 3 |
| 400 x 5 | 330 x 100 |
| 20 x 1 3/8 | 37-451 |
| 22 x 1 3/8 | 37-501 |
| 24 x 1 3/8 | 37-540 |
| 24 x 1 | 25-540 |
| 25 x 1 | 25-559 |
| 26 x 1 | 25-590 |
The next thing to decide is the Tyre Tread Pattern. This is fairly easy and you should be able to match the pattern you have with the pictures on the web site. As a rule of thumb a ribbed (lined) pattern tyre fits the front wheels and a block (chunky) pattern fits the rear wheels. Some scooters have the same tread pattern on both the front and rear. In this instance it would be a block pattern.
 The final thing to decide is the tyre Colour.
Grey tyres are normally fitted as they are non marking but black are also available. If you decide to order black please be aware that they will mark floors and carpets if used indoors.
In nearly all cases the tube size corresponds to the tyre size.
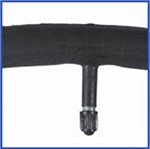
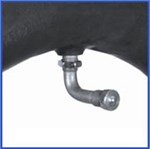 The only thing to decide is what type of valve (where you inflate the tyre) you require.
This can be a straight rubber stem valve or a bent metal valve (see pictures left).
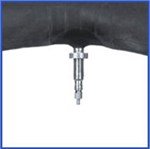
If you are buying inner tubes for sports wheelchairs some of them use a high pressure valve called ‘Presta’ valve. (Picture left)
 Once you have decided which valve type you require, you should be able to find it in the relevant category.
Tyre Sizes & Markings Explained…
There are several methods for giving the size of tyres, with measurements sometimes in inches, sometimes in millimetres, sometimes in both! To help you understand a little better, we have examples and explanations of each method below, from which you should hopefully be able to recognise your own size markings.
When considering rim diameter, please be aware that it is effectively the diameter of the hole in the middle of the tyre. The measurement from edge to edge of the wheel itself includes the tyre retaining rim flanges, and so will be about 1″ greater than the actual marked size.
eg 3.00-4, 3.50-6, 4.00-8, 5.20-10, 6.00-12
This is the most simple size marking. The first part, 3.00, is simply both the width of the tyre and the height of the sidewall of the tyre in inches. The second part, -4, is the rim diameter in inches. So a 3.00-4 tyre would fit a 4″ diameter rim, be 3″ wide and 3″ tall on the sidewall. Therefore, the overall height of the tyre would be 10″ (4″ plus 3″ plus 3″).
eg 6-12, 7-14, 8-16, 9.5-18
Similar to above, but this method does away with the ‘.00’ bit for the first part of the size. Again, all dimensions are in inches. It is worth mentioning that tyres with very similar markings may not be compatible – a 6-12 tyre will be significantly different in size to a 6.00-12. Whilst this may not be important if the application is say a two wheeled rotavator tyre, there can be more serious consequences if you change the tyre size on a four wheel drive tractor which will affect the gear ratios. If in doubt, stick to the exact size that is fitted to the vehicle or recommended by the manufacturer.
eg 4.10/3.50-4, 4.10/3.50-6, 5.30/4.50-6
This time there are three parts to the tyre size, all in inches. The first, 4.10, is the approximate width of the tyre when fitted to the recommended wheel. The second, 3.50, is the height of the sidewall, and the third is the rim diameter.
So a 4.10/3.50-4 tyre is 4.1″ wide, 3.5″ tall on the sidewall and fits a 4″ rim. This tyre would therefore have the appearance of a low profile tyre. ie it is lower than it is wide.
eg 11×4.00-4, 13×5.00-6, 18×8.50-8, 25×12.00-9
This method is widely used on turf and ATV tyres and is probably the easiest to understand. The first part is the overall height (from the ground to the top of the tyre) of the tyre in inches, the second part is the width of the tyre in inches, and the third part is the rim diameter in inches.
If you are looking to change your tyre size, the height and width may be selected according to your needs, but the last figure, the rim diameter, must be the same, unless you are buying new wheels too!
So a 25×12.00-9 ATV tyre would be 25″ tall, 12″ wide and fitted to a 9″ rim.
eg 10×3, 18×4, 260×85
This method is becoming obsolete, but you may still have tyres marked in this way. Measurements can be in inches or millimetres (look at the examples above, it’s fairly obvious which is which). The first part is the overall tyre height, the second is the tyre width.
The rim diameter is not mentioned in this size marking, but it can be easily worked out, because the tyre sidewall height will be the same as the tyre width. So, an 18×4 tyre is 18″ tall, 4″ wide, and fits a 10″ diameter rim (18″ overall height minus two lots of 4″ high sidewalls). The modern equivalent size for an 18×4 would therefore be 4.00-10.
A 260×85 tyre would be 260mm high and 85mm wide. Converting these dimensions to inches gives us a tyre 10″ high, 3″ wide on a 4″ rim. The modern equivalent size would be a 3.00-4.
Be the first to know about our special offers, subscribe to our newsletter >>